
Why the need for yet another Selenium IDE start up guide? Well due to a variety of changes and security threats in the world of the web, web browsers like Firefox have had to step up their game and become more secure. The unfortunate side effect of this is that most Firefox browser development and testing plugins are not able to function in the same capacity we are used to seeing. So this guide is a way to help those new to Selenium or just haven’t used it in a while to get up to speed so they can begin recording and play back tests.
For starters, to run your Selenium recording/tests from the Selenium IDE, you have to install a separate Selenium server. This tool will allow all of your tests to interact with the browser. This approach is becoming the norm. Especially, as the industry demands keep pushing for more secure browsers. However, there still needs to be a way to allow us to continue developing and testing our applications.
Selenium IDE: Quick Start Guide
Before You Begin
- You will need the Firefox web browser to use the Selenium IDE. So make sure you download the correct version for your operating system.
- Next, download the Selenium Server from Seleniumhq download page. Since the server is packaged as a Jar, all you will need to run the server will be a Java Runtime. This runtime can be download from the Java downloads page.
Let’s Get Started
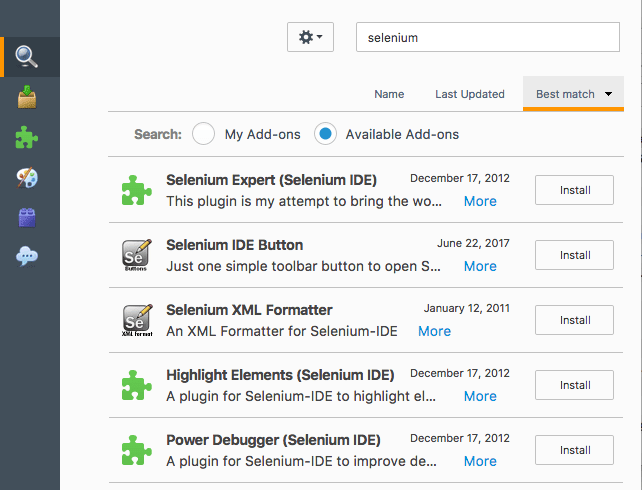
- First, you need to install some Firefox plugins for Selenium. To do this go to the menu bar and click Tools > Add-ons, or click on the menu icon.
 Then in the search bar type in “Selenium.” The search should bring up a list of add-ons similar to this one. Note: Do not install the Selenium Builder, this is not a part of the Selenium IDE.”
- Next, install any plugins with the Selenium IDE in the name. Make sure you also install the Selenium IDE Button and the Selenium IDE add-on. The Selenium Button will make it easy for us to access the Selenium IDE from our browsers. Note: most of these plugins will require Firefox to restart.
- Now, once you have all the plugins installed, let’s add the Selenium IDE Button to our toolbar. Click the menu icon. Then click on customize. It will bring up the Additional Tools and Features window. On this screen, you can drag and drop the available add-ons to your tool bar or menu. This window is also where you can show/hide your browsers Toolbars, title bars, and customize your themes. Go ahead and drag the Selenium IDE Button
 to your toolbar. Once, you are finished click “Exit Customization” to return to your main browser window.
 - Finally, you should see the Selenium IDE Button on your toolbar.

Example: Using Selenium to Record a Test
For this example, we are going to open up Amazon.com and search for books on selenium.
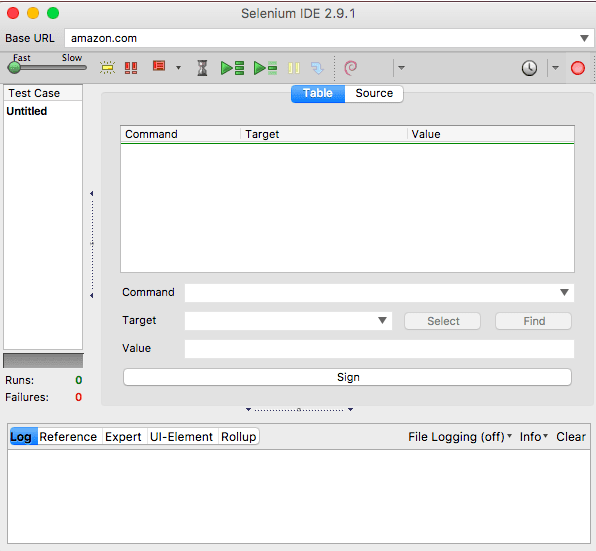
- Go ahead and click the dropdown next to this Selenium IDE Button to open the Selenium IDE as a popup.
- Now let’s record our first test. Click on the record button.
 It will enable the Selenium IDE to start recording your mouse clicks and keyboard inputs as you interact with the website.
 - Then, type “amazon.com” into the browsers location bar and hit the Enter key.
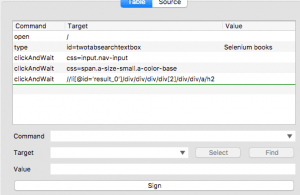
- Next, on the Amazon page type in “Selenium books” in the search box and hit the Enter key.
- Scroll through the search results for and find and click on Computers & Technology.
- Follow that up with a click on the book: Learn Selenium in 1 Day: Definitive Guide to Learn Selenium for Beginner.
- Finally, click on the record button again to stop recording.
Your Selenium table view should look like this:
Example: Using Selenium to Playback a Test
Now that we have recorded our first test case how do we run it? So for this example, we are going to playback the recording we made in the previous example.
- In your open Selenium IDE look for the icon
 and click it to play your test.
You should see your test play out in your browser window. Begining by resetting your browsers starting page to your starting URL “amazon.com.” Quickly followed by your inputs and clicks as your test is played out. That’s it! You have now successfully recorded and played back your first test.
Congratulations! You are now on your way to building a test suite of tests. All you need to do now is save off your recordings by clicking the File > Save option and storing your test suites to your file system. It’s that easy. So go forth and begin building your QA solution. It’s not that hard, and once you start, you will find it hard to stop.