
In the IT world, there are three major operating systems in heavy use on non-mobile computers. These are Windows, Unix, and iOS. Linux is a variant of UNIX and iOS is as well. Thus, we have only two environments we need to be able to navigate for our development and admin work: Windows and Unix/Linux variants. Since we just built a Linux server for ourselves, this seems like a perfect time to go through a crash course in Linux. We will cover Windows navigation in another class.
What are the problems we want to solve by taking this class?:
- How do we benefit from the server we just created?
- What are the tools/commands we need to understand to administer our server
- How do we start building a professional grade environment to work with and deploy our website?
What we will cover:
- A Linux Overview
- Your Home and navigation
- Wildcards and Searching
- Important Folders and system Layout
- Permissions, owners, and groups
- Tar, Gzip and gathering files
Class Goal: Create a set of folders and add organization to your server. Learn enough Linux commands to navigate your new system.
Note: This is another reference style class and necessarily has little direct impact on the end project, but it is a foundation for future work we will be doing. This Linux Overview is where we do some “behind-the-scenes” work for our project.
Linux Overview
Linux is a sort of family of operating systems. There are actually a number of Linux variations in use today called “distributions.” Most of these are free to use and open source, but the licensing restrictions vary from one to the next. We are using the Amazon Linux distribution so we don’t need to know much else for now. It is helpful to have an idea of distributions just in case you run into one. Once you are comfortable with one distribution it is not too hard to move to another, in fact, most of what we cover here will work on any Linux distribution. Let’s spend a few minutes on the current landscape…
The Big Players
In the last few years, RedHat has continued to be one of the top Linux distributions with its partner CentOS. Ubuntu is one of the other top distributions and then Mint, Debian, SUSE, and Fedora round out the most popular of the modern distributions. Slackware and Puppy Linux are popular but tend to be used on older, less powerful systems and commercially are more likely to provide low-end mail or file servers rather than anything that would need more horsepower. The good news is that all of these are relatively similar and skills tend to be interchangeable across distributions. The biggest differences tend to be the package systems (we are using YUM) and the default folder structures. Ok, wipe that drool off your mouth and let’s get to work.
Graphical Interfaces
There is a graphical user interface (GUI) available for Linux (specifically a family of them like, X-Windows, KDE, Gnome, and others) that will seem a bit familiar. The GUIs available for Linux have a lot of similarities with Mac and Windows interfaces, but we are not going to have one for our server. We are going to use the console interface for our work, which is a little more intimidating than a GUI, but worth it to know.
Before we get started, please understand that Linux is case sensitive. Make sure you match case for commands. They are almost always all in lower case, but if you have problems, verify the letter casing is correct.
Home and Navigation
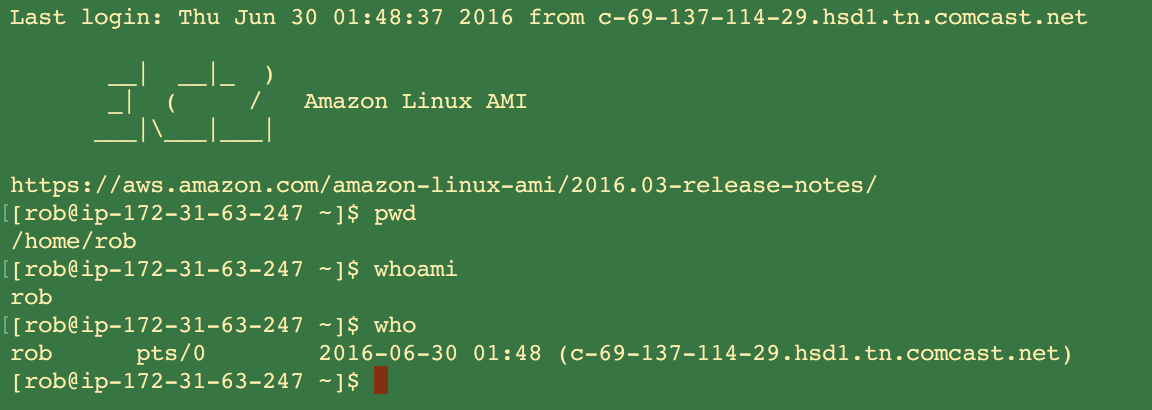
Every user in the Linux world has a home. The root user has a home at /root, and most others are in /home/username. In our case, you should be logging in with the username you created. I will be doing the examples logged in as myself: “rob.” When you connect to your server, you will be in your home directory (/home/rob, in my case). Log in and let’s verify a few things. Here are three commands for you and the effects:
pwd -  This gives you your current location.  Once logged in. I type "pwd"
       and hit return, the console will show me /home/rob.
whoami - This asks who you are logged in as. When I type whoami it returns rob
who - This lists who is logged onto the server and where.  For now it should just
      list you. If you have multiple users on a machine then each user will be
      displayed on a separate line.
A brief guide…
Let’s go up a level from our home: type “cd ..” hit return and then type the “pwd” command. Now your response should be /home. In the Linux world (and we will see on Windows as well) the “dot dot” (..) means go up a level and the dot (.) means the current directory. If we type cd .. again we are as far up as we can go and “pwd” will return /. Now type “cd” and hit return. When you run the “pwd” command, you will find you are back at your home. In Linux, you can either use cd without parameters to get home or you can use a tilde “~” so “cd ~” is the same as the “cd” command. In either case, this will return you to your home folder if you ever get lost. It’s easier than clicking your heels together three times.
cd - This is how to move around directories.
     Give a name to change to that directory eg."cd /opt"
     No parameter to return to the home folder eg. "cd"
     "cd .." to move up a level.
Wildcards and Searching
One of the things will do a lot is look at files, folders, and search for things. Let’s go back to our home folder and look at the files and folders:
ls - This lists the files and folders for the current directory or the
     one designated.  Run ls in your home folder and you will likely
     have nothing returned.  We will add to the home folder later.
Now from the same location run ls / and you will see some results. These are the folders at the root of the system. Type ls -l / and you will get a lot of information returned:
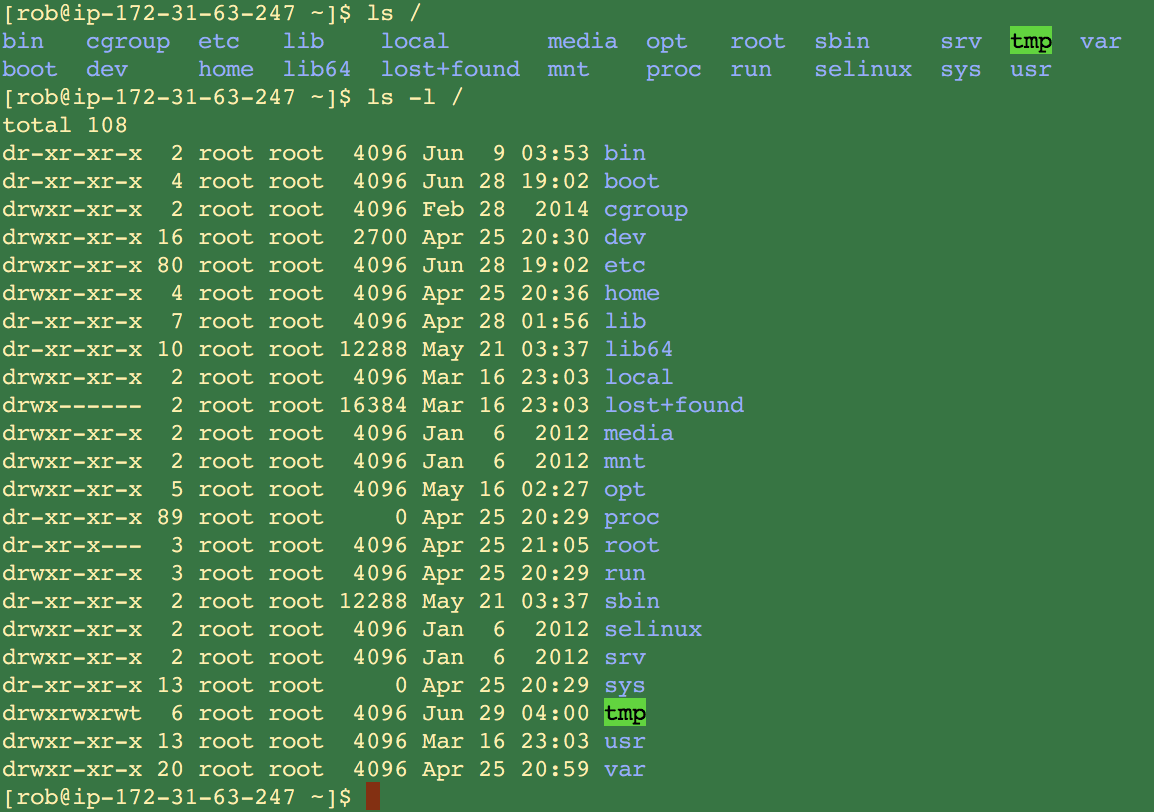
Most Linux commands have options that are designated by a hyphen. The ls command has the -l option and many others.
man - This lookups a command in the system manual.  It is the best
      help you can find.  eg. Type "man ls" and you will get pages
      of information.  Hit "q" to escape out of it or the space bar
      to page through the documentation.
Wildcards
Take a few minutes to review the ls man page. You will see the -l option and many other useful ones. For example, if you run ls -al from your home folder you will see more results than you did earlier. The -a returns hidden files as well as non-hidden ones. In the Linux world, any file name that starts with a period is considered protected so you will probably see a .bash_history or .bash_profile file. We will come back to those later. Change to the root folder (cd /) and use the “ls” command. You will see several files. However, when you enter the “ls b*” command you will see a lot more results. Now the results include lines like bin: and boot:.
The “*” is a wildcard and in this case, we are asking for a directory listing of everything that starts with the letter b. It tells us it found two hits (bin and boot) in the current folder and gives the listing for each. The wildcard asterisk is available almost everywhere in Linux, so we will make sure to remember that particular argument.
Searching
* (asterisk) - This is a wildcard which says anything that matches
       this is included.  If you have the words:bad, big, bid, and
       bob then b* would include all of them while bo* would only
       return bob.
find - The find command is used to find files on a system.  For
       example, go to the root folder (/) and run "find . -name java"
       this says find anything with the name java starting here
       (the period).  You will get a lot of error messages that
       makes for a difficult read.  Try the same command prefixed
       by sudo (sudo find . -name java) and you will get a cleaner
       result. More about sudo later.
grep - The grep command searches for text within a file.  Go to your
       web folder (/var/www/html) that has index.html and type "grep html *" you
       should see two output lines that give a filename and then
       the line that contains the text.  If you go up a level and
       type "grep -R html *" you will see a much longer list
       depending on how many html files have been created.
These two commands will be your best tools for finding files and information on a system, particularly when you are configuring a system.
Folders and Layout
It is helpful to get a general layout of a typical “UNIX/Linux” system so you can reduce your time searching for files. We have already talked about your home. It is typically a folder with the username in the /home folder (/home/rob for me for example). Let’s look at others and what to expect to find in them:
/bin |
Binary files and commands like: find, grep, ls, etc |
|---|---|
/sbin |
Similar to the “bin” folder. However, this is for commands used by admins and the system like, “reboot”, “iptables”, etc |
/dev |
Device files. There are mappings to devices like hard drives, terminals, etc. It is rare to ever use these unless you are an admin or to get to files on a particular disk |
/etc |
Configuration files. This is usually where you will find configuration files for an application. We will be doing work in here in some of our classes. |
/proc |
These are system processes. Think of it as a look into the current operating system state and we won’t worry about these anytime soon. |
/var |
Variable files. This is for files that are likely to grow like log files and spool files for mail or printing as well as locks and temp files. |
/tmp |
Temporary files. These will be deleted on a system reboot. |
/lib, /lib64 |
Library files. These are system and application libraries and we won’t worry about these unless we hit a problem |
/local |
Local files. This is often considered a place to store apps and files for the administration of the server. Sort of like a storage shed for admins. The “/usr/local” folder is similar and both of these tend to be around for legacy reasons |
/boot |
Boot loader files and the system kernel. Nothing to see here, move along |
/lost+found |
This is used to set aside files that might otherwise be lost when the system cleanup tool fsck is used. We may come back to this in a future class, but it definitely more of an admin topic. |
/media |
This is where you can access things like a CD-ROM or disk drive. Ask your parents what those are. |
/mnt |
This is used to mount devices sort of like the media drive. |
/run |
This and /var/run are used as storage space for running programs. This is an advanced developer topic we may get to in a future class. |
/opt |
Originally for optional programs. I find this often to be the place where things are stored on a development machine and it is not uncommon to find database and web server files here. I have set up some machine to use this as a sort of shared drive among users. |
/usr |
This is for user files and applications. When you are adding custom apps and data for your user this is where it should go although often the defaults are such that root access is needed to grant write permissions. The “/usr/share” folder is technically the best place to put files intended for use by everyone. |
There are a lot of personal preference guidelines and history to these folders that make these notes more a suggestion rather than a hard and fast rule. In general, the bin, sbin, etc, dev, and var folders are mostly strictly adhered to while “usr” and “opt” can vary widely. Your best bet is to pick a path and be consistent for your own servers. For servers that you do not own you will need to do a little poking around to figure out how each is setup unless you have a standards document laying around. It doesn’t hurt to document your standards as you create them so future admins can hit the ground running.
Permissions, Owners, and Groups
I have to warn you that this may be one of the most complicated technical things we cover in the Introductory course. It is, however, a fundamental concept for you to understand and be comfortable with, whether you are an admin for your own machine, you are a Mac “power user” or if you want to do admin work professionally (i.e. you want to get paid for it). The concepts of UNIX security apply to any Unix variant including all Linux distributions. That means that once you have this down it is a very portable skill. You will also find the concepts translate to varying degrees to other operating systems and environments so this is a great skill to have.
An example
Let’s go back to your home folder and enter the “ls -l” command. You will see the long form listing of your files and folders. In my case I get this:

The permissions for the files and folders are the leftmost pieces of data with the first character being a type indicator. Let’s move left to right for the first line (holding -> /opt/holding).
The first letter is always an l, d or – where l designates a symbolic link, d designates a directory and – designates a file.
The next nine letters (“rwxrwxrwx”) are three sets of three permission designators.
These permission identifiers are what we want to discuss here. In the Unix world there are just three permissions available: Read (r), Write (w), and Execute(x). Read permission allows a user to read/view a file. Write permission allows a user to save changes to the file, delete it, or overwrite it. Write also allows file and folder creation. Execute allows a user to execute or run a binary or script.
The Three Levels of Permissions
So three permissions, but why nine slots? There are three levels of permissions: user, group, and global. They read left to right so for the homePage.jpg file in the listing the user rob and the group rob have read and write permissions while the global permissions (all other users) can only read the file. File permissions are set via the “chmod” command. The command accepts a set of three numbers, one for the user, one for the group, and one for global. For example, “chmod 644 *” would set the 644 permission settings for all files in the current folder. How do we get from letters (R,W,X) to numbers? Now we get a little geeky… The letters translate to a value Read = 4, Write = 2, Execute = 1. We then add up the values to arrive at a number from zero to seven for each permission.
Chmod Example
For example, The chmod 644 command says for the user provide read and write permission (4 + 2 =6), for the group give the read permission only (4) and also for the global scope.
A chmod of 777 grants everyone all access, while chmod 000 allows only root to do anything with the file.
The root user is unique since it always has access to a file. You will never use a chmod 000. However, you might do a hundred chmod (700, 600, 500, etc.) to restrict access to only the user. We did this during our setup to configure our login files.
Returning to the screen shot.. after the designators, you will see “rob rob” for each item. The first text is the owner and the second is the group. If you cd to the root (cd /) and type “ls -al” you will see some other owner and group examples.
Owners and Groups
The two commands for assigning owner and group to a file or folder are:
chown - Changes the owner of a file.  You must be root to change the
        ownership of a file or directory (or sudo) The syntax is
        chown [new owner] filename.  For example "chown rob index.html"
chgrp - Changes the group of a file this is done via root access or can
        be used to change group ownership if the user running the
        command is in both groups.  For example if the user rob is in
        the admin and users groups then "chgrp users myfile.txt" will
        work if the current group is admin, but if the current group
        is www and rob is not a member of that group, it will fail.
The Importance of Permissions
In general, permissions and security can seem like an unneeded headache. However, security is an essential part of Unix (and now Windows). Thus, get into the habit of setting permissions as tight as possible. This will be useful for your own servers and applications, as well as a critical part of any work you do for others. This should be all you need for now and we will take a further look into security in later classes. As a final warning, be careful about removing permissions and setting owners. A mistake can make it impossible to access a file. The root user can always do anything needed to a file, but locking yourself out of access can be annoying.
Tar, Gzip, and gathering files
Sooner or later you are going to want to work with and move around groups of files. Before we get too far into this section lets first look at some single file commands. Note that permissions may impact the success of using these commands. For example, any command that deletes a file requires the write permission for that file. We have come across some of these already, but for reference lets review:
cp - Copies a file on the current system.  This is pretty simple and
     is in the format of: "cp myfile.txt /opt/myfile.txt"  You can
     use ".' to copy to the current location ("cp /opt/myfile.txt .")
     and you do not have to provide the target filename unless you
     are changing the name.
mv - This is the same as the cp command, but it moves the file or
     folder to the new location which deletes it from the source
     location.
mkdir - Creates a folder/directory.  In our EC2 install assignments
        we used mkdir to create a backup folder for example.  The
        format is mkdir [directory name]
rmdir - Removes a directory. The format is "rmdir [directory name]"
scp - This is an encrypted copy from one server to another.  It
      requires a login to a remote server.
Examples
let’s say I am copying a file named index.html from my local machine to my ec2 server. The command would be:
scp -i robserver.pem index.html [email protected]:/home/rob/index.html.
In order to secure copy a file, I either will have to use a password or a shared key. In the ec2 example, we always use a key rather than a password. Note that you always have to provide a fully qualified path to the target file.
Grouping and Compression
We have just covered the most common file manipulation commands. Now let’s look at some instructions for grouping and compressing files and folders.
tar - This is a legacy name of tape archive.  This command groups
      files together in a single archive file sometimes referred to as
      a tarball.
The backup of our home folder makes a great example:
tar -cvf /opt/holding/rob.tar rob/*
The options “cvf” are for create, verbose, and filename. The “f” option always precedes the name of the file you are creating. In this case, a single file called rob.tar is created in the /opt/holding folder. When run, the command will list out the files it is placing in the tar file (due to the “v” option).
Uncompressing and Ungrouping
Now let’s look at unarchiving files:
- Go to you home folder
- Run the “mkdir temp” command to create a folder called temp
- cd to temp
- Type the command “tar -xvf /opt/holding/rob.tar” replacing rob.tar with the name of the file you created.
Now take a look at the folder and files in the temp folder to see how the structure is maintained in a tar file. The tar command provides a method for backing up and moving groups of files at a time.
gzip - This is an open source compression utility (gnu zip). Usage is:
       gzip filename where filename is the file to compress. Output is
       the source file compressed and renamed filename.gz.
The gzip command is fairly common on Linux systems. It also provides a lot of key functionality in dealing with compressed files made by other tools. The original (uncompressed) file is removed during this process. To uncompress, add the -d option (decompress).
Examples
When I compress my tar file rob.tar with the command “gzip rob.tar” then I will have the file rob.tar.gz as output.
When I run “gzip -d rob.tar.gz” then I will get rob.tar back in uncompressed form.
The tar command integrates with gzip so I can issue the command “tar -xvf rob.tar.gz” and it will uncompress and un-tar the files. In this case, it will leave the compressed version of the file on the drive.
All of these commands have a lot more functionality than we have gone into here. Therefore, take a look at the man page for more options. When in doubt about any Linux or Unix command go to the man page first.
Wrapping Up
We have just touched on some of the most common Linux commands. However, you now have some examples of how to move around, create, delete, and secure files on your system. Don’t forget, you can use the man command with a command name (eg. man ls) to see complete details about a command. The “man page” also will provide examples and references to related commands. You can also browse the /bin folder if you are feeling curious about commands that might be available.
Google is also a great source of information. Linux has a huge amount of community support. Use search terms describing what you want to do such as: “move directory and files to another location Linux command line”. The search will return a number of posts and examples for almost anything you ever need to do.
You will find these commands all become second nature as you use them more and more and we will return to these in future classes with some more advanced usage of commands.
Assignments
- Create downloads and scripts folders in your home folder.
- Create a backup folder in the /opt folder. Now set the permissions so any user can read, write, and execute files in that folder.
- Create a backup of your home folder (/home/rob) and store it in your backup folder
- Compress your backup file
- create a temp folder in your home and restore the backup to that folder
- Remove the temp folder and everything it contains
Bonus: Create a symbolic link from your home folder to your website so you can type cd backup in the home folder and go right to your backup folder. Then add a link to your web folder.
Once you complete this class, it is time to move on to the next step: Learning the VI Editor
Further Reading
Outside of additional classes here, we have found these sources to be ideal for finding out more about Linux and getting around in it:
A Great Linux Command Quick Reference
Linux Pocket Guide: Essential Commands
[sgmb id=”1″]