Getting Started
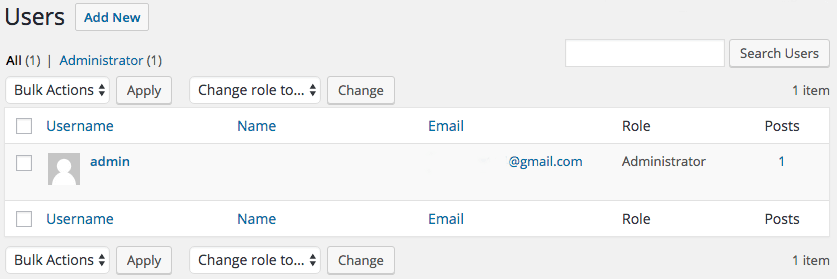
Before we can start to create accounts, we need to log into the WordPress Dashboard. On the left, in the WordPress dashboard, you will see a person icon that says, Users. Go ahead and click on Users, to go to the User’s Dashboard. The User’s Dashboard lists all the current users registered on your site. This is the main Dashboard you will be using to create accounts.
Users Dashboard
On this screen, you should see a list of accounts. If this is a new WordPress instal then you will only see one account. For instance, this is the master admin account I created during my WordPress installation. As seen here:
Create Accounts
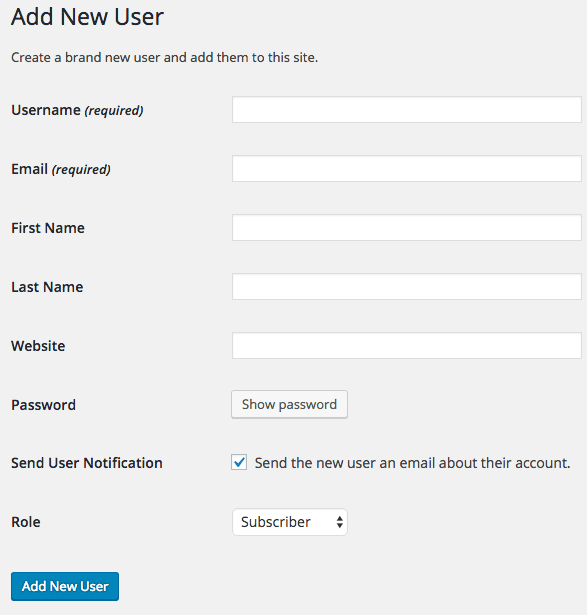
To add a new user go to the top of the screen and click the “Add New” button. The new screen displays the Add New User fields.
Here is a list of the fields and a brief description of what they are for:
| Username (required) | Username of the new user here. In fact, this username will be their new WordPress login name. |
| E-mail (required) | A valid e-mail address of the new user here. The e-mail address must be unique for each user. During the comment approval process, a notification e-mail will go to the e-mail address of the author. |
| First Name | First name of the new user here. |
| Last Name | Last name of the new user in this text box (the display name defaults to first and last name). |
| Website | You may enter the new user’s website URL in this text box. |
| Password | Click show password to get a password for the new user. If the password is weak, you will need to check the confirm weak password before you can continue. |
| Strength Indicator | This indicates if the password you entered is Very Weak, Weak, Medium, or Strong (displayed in green). For instance, the stronger the password, the more secure the login. Hint: The password should be at least seven characters long. To make it stronger, use upper and lower case letters, numbers and symbols like !”?$%^&). |
| Send User Notification | Sends the new user an email about their account. |
| Role | Select the desired Role for this User from the drop-down box. Default: Dashboard > Settings > General – New User Default Role |
What Fields Are Required?
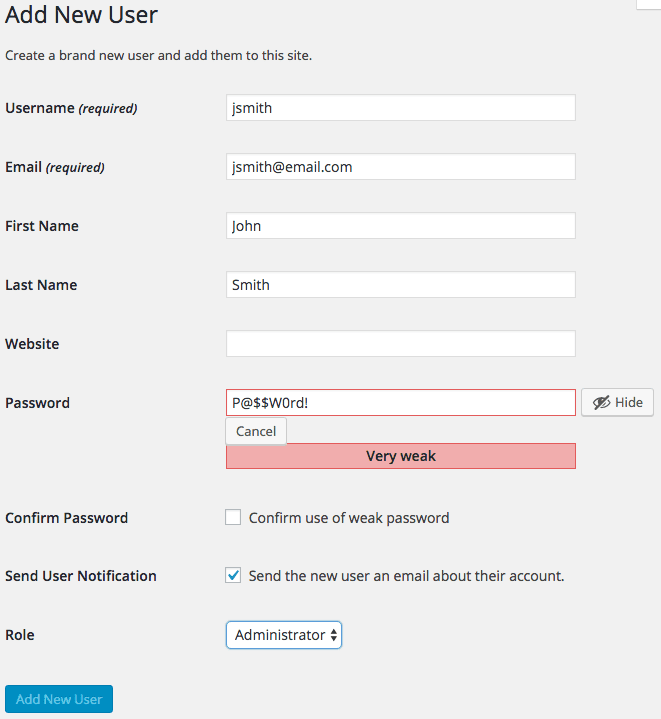
Username needs to be unique, but should be somewhat descriptive so your account can recognize you on blogs and logs. I recommend using your first initial with your full last name. So if your name is John Smith, then your username will be jsmith. Make sure you go ahead and fill in the First and Last name fields. These values may be optional, but will help identify you even more as the author on blogs and pages. Finally, make sure to set your account role as “Administrator”. However, if you forget to set this now default your account to “subscriber”. This is the role with the least access to the system. For example, here is what the fields should look like:
View Accounts
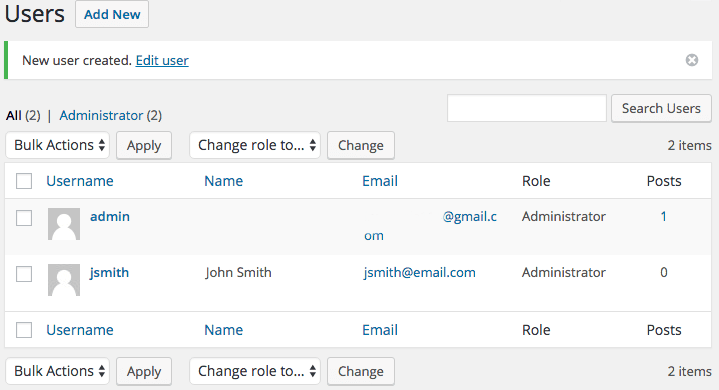
After you click Add New User, your setup is now complete. This will create your new user and return you to the User Dashboard. When the screen loads you should see your new user on the list:
Your new account is set up. If you chose to send user notification, then you should have received an email confirming the account was set up. This concludes the account setup process and we are now ready to use our new account. To demonstrate, go ahead and log out of WordPress. Then, enter your new account and password on the login screen. This should log you back into WordPress as an administrator.
Note: This will be the administrator account you use going forward. Remember to store the master administrator account somewhere safe. For instance, when you cannot use your personal account to fix a problem.
Additional Resources
- Check out Users at WordPress.org
- Check out these books:
We hope you found this information useful. If you are taking our “Introduction to WordPress” class click here to return to where you left off.
[sgmb id=”1″]


